Monday, October 5, 2015

The big wall

by Kathleen

This a rather picture heavy post, and my first attempt at video...

The most controversial (among our friends) redecorating choice we planned to make in our house was to remove the living room wall mural. (photo from the listing)

A lovely (seriously, not sarcastic) example of the 60's chinoiserie style of specialty focal wallpaper. On a textured background a "Chinese" scene was "brushed" in gold...  tall craggy mountains in the background, pagoda buildings with bridges and pine trees in front, complete with a little lady with a parasol standing on a bridge.
Nice... but so not us.
Some of our friends felt that it was so iconic that it had to stay. But they didn't have to live with it. We decided it would go and go quickly. And so it did.

We were lucky... it was pretty easy to remove. And this is a photo essay of the process.


The first step is to pierce the paper with a tool made expressly for the purpose. There are many versions about, but what we used is called the Zinsser Paper Tiger. Its spiky wheels roll about and leave these trails of poked holes so you can see where you've been. Don't skimp on this step.

Because after piercing you soak the paper in something to dissolve the glue backing. The more holes you've poked the easier the solution gets behind the paper. There are a lot of different wallpaper glue removers, but we made our own with water, vinegar and liquid fabric softener. If I had to do it again I might skip the softener... I think it was there mostly to thicken the spray so it wouldn't drip, but it left a slick feel to the walls. And didn't really thicken it enough to justify its inclusion.
Spray it on heavy and let it soak in... about 5 minutes. But not too long or it'll dry and you'll just have to respray. Once it's saturated the wallpaper should scrape off smoothly... if you're lucky. Which we were... video as proof:


Notice, by the way, how I'm holding the scraper at a low angle... the lower angle you hold the less you'll dig into your wall, and the smoother the paper will slide off.

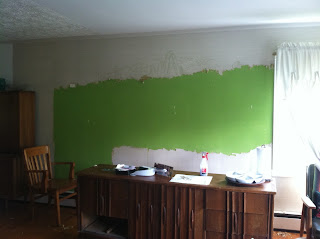
Some process shots (and yes, that green is the original underneath color)...


Yay! No wall paper!

The next step (after giving the walls a good damp wiping down to remove any leftover glue or fabric softener) is to fix any damage, dings, or dents. We had a lot of mudding and sanding, and mudding and sanding to do. But the clean flat wall afterwards was worth it.


Last step, and anything but least...
Paint!!!


We went for a light, bright green. We covered the full wall (the dining section had been painted white previously). I'll be honest, I don't remember if we primed it. But obviously if we'd wanted white walls we would have had to prime over that original green. I think this color covered, as it was, with two coats.
We're still choosing artworks for the wall. We have a different option up now... more long and rectangular with darker colors. That's the great thing about having artist in the house... I never have to go without art!!!


Here there be socks

by kathleen

My usual sock model was unavailable


So Simon kindly filled in.


Boring variation of knits and purls in a wonderful sock yarn bought on vacation in the OBX (vacation yarn is souvenir yarn so it doesn't count as stash... right?)... the Black Pelican colorway.

Tuesday, July 28, 2015

Dyeing again

byKathleen
Last Weekend we had a little Dye party at my house.
I belong to a local fiber guild and as we looked for classes we could offer each other I thought of the silk culottes I'd dyed a couple years ago... a-short-disucssion-on-shorts-dyeing
and I offered to teach the (extremely simple) method. So we ordered silk scarves and acid dyes from dharma trading and, following the tutorials from their site mixed with my own implementations, the 6 of us had a blast!
Four of my final five scarves...
It was pointed out to me, as these lay drying on the lawn that I'd gone for purples and greens. Again. And I felt I had to break out, so I forced myself to do something a little different and here are the final five, with an orange and pink friend.

The two to the right are burnout (first and last in the upper photo), which means that the background is silk, which dyed, and the satin pattern is rayon, which did not dye. It's really a gorgeous effect in person.
The other three are habotai and crepe de chine... more plain surfaced, but still light weight. 

But the boldest dyed of all were... my hands.

Do as I say, not as I do... wear gloves. 
Although this stuff washes of skin pretty quickly...

 (this is next day)
my fingernails are still purple.

Sunday, March 22, 2015

strip a little, paint a little, strip a little...

Strip a LOT!
One drawback to our house from the very beginning were the many walls covered with wall paper of... well, let's just say not our taste. We knew there would be wallpaper stripping in our future, but we put it off for a long time out of, I admit it, fear. I heard such horror stories! One of my colleagues told me that before she had to remove wallpaper again she would move houses!
But moving wasn't an option. And the wallpaper just had to go. Had. To. Go.
So it did.
The hallway first...

This is a kind of wall board rather than wall paper. It's fake paneling on the bottom half and fake off white moire stripe on the top. Nailed into the wall with seventy bazillion tiny nails.With a strip of molding nailed across the seam.
This is the crown molding that previous owner put up... if you know what crown molding is and how it's supposed to work you'll see what's wrong with this picture. Even if you have no idea how crown molding is supposed to be installed you can still see the interesting way the corner miter was just... totally ignored ("We don't need no stinkin' corners!").
So we ripped off the moldings and the wall board thinking "This is a breeze!" and found...


The previous wall treatment that they had started and given up on... burlap cloth on the bottom and a woven reed and grass over foil wallpaper on top. 
It was HORRIBLE to get off! We had to rip the layer of reeds off with a scraper; massively puncture with a scoring tool and then saturate the foil; and then slooowly putty knife scrape it off... inch by aggravating inch. 
I didn't blame those owners one bit for giving up halfway and covering it with the wallboard. I was half tempted to reapply it myself a time or two. Or three. 
But we persevered (and perspired)... 
and got the wall completely clean...
patched and sanded the thousands of nail holes... and painted.


It's kind of hard to photograph as it's a hallway and not conducive to wide angle photos, but we continued the fireplace wall grey up one side and white around the remainder. And we love it! It's so much brighter and cleaner feeling. And the effect of the grey wall traveling up the stairs makes the space feel like it goes on...

I will continue to the easier, yet more controversial, wallpaper removal in the living room next time.
AND... I knit a pair of socks! yes, you heard right. I knit. And it was a pair. I will share that next time too.

Wednesday, March 18, 2015

Not really a post

Follow my blog with Bloglovin

All the blogs I used to read on bloglines have disappeared. So I switched my reader, and I'm registering the blog. Even a limpy blog is worth holding on to!