This a rather picture heavy post, and my first attempt at video...
The most controversial (among our friends) redecorating choice we planned to make in our house was to remove the living room wall mural. (photo from the listing)
A lovely (seriously, not sarcastic) example of the 60's chinoiserie style of specialty focal wallpaper. On a textured background a "Chinese" scene was "brushed" in gold... tall craggy mountains in the background, pagoda buildings with bridges and pine trees in front, complete with a little lady with a parasol standing on a bridge.
Nice... but so not us.
Some of our friends felt that it was so iconic that it had to stay. But they didn't have to live with it. We decided it would go and go quickly. And so it did.
We were lucky... it was pretty easy to remove. And this is a photo essay of the process.
The first step is to pierce the paper with a tool made expressly for the purpose. There are many versions about, but what we used is called the Zinsser Paper Tiger. Its spiky wheels roll about and leave these trails of poked holes so you can see where you've been. Don't skimp on this step.
Because after piercing you soak the paper in something to dissolve the glue backing. The more holes you've poked the easier the solution gets behind the paper. There are a lot of different wallpaper glue removers, but we made our own with water, vinegar and liquid fabric softener. If I had to do it again I might skip the softener... I think it was there mostly to thicken the spray so it wouldn't drip, but it left a slick feel to the walls. And didn't really thicken it enough to justify its inclusion.
Spray it on heavy and let it soak in... about 5 minutes. But not too long or it'll dry and you'll just have to respray. Once it's saturated the wallpaper should scrape off smoothly... if you're lucky. Which we were... video as proof:
Notice, by the way, how I'm holding the scraper at a low angle... the lower angle you hold the less you'll dig into your wall, and the smoother the paper will slide off.
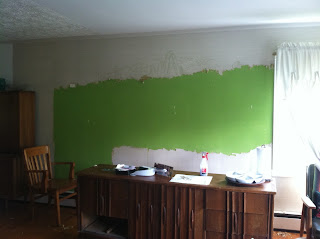
Some process shots (and yes, that green is the original underneath color)...

Yay! No wall paper!
The next step (after giving the walls a good damp wiping down to remove any leftover glue or fabric softener) is to fix any damage, dings, or dents. We had a lot of mudding and sanding, and mudding and sanding to do. But the clean flat wall afterwards was worth it.
Last step, and anything but least...
Paint!!!
We went for a light, bright green. We covered the full wall (the dining section had been painted white previously). I'll be honest, I don't remember if we primed it. But obviously if we'd wanted white walls we would have had to prime over that original green. I think this color covered, as it was, with two coats.
We're still choosing artworks for the wall. We have a different option up now... more long and rectangular with darker colors. That's the great thing about having artist in the house... I never have to go without art!!!


1 comment:
I strongly suspect that murals are the sorts of things that one likes best in OTHER people's houses. :)
Post a Comment